Всем здравствуйте, кто зашел на наш сайт. В одной из прошлых статей мы подробнейшим образом рассмотрели, что такое браузера Mozilla Firefox. Это папка, в которой хранятся все наши настройки Firefox. Она создается при по умолчанию при первой установки браузера. Но иногда возникает ситуация, когда потребуется несколько профилей для этого браузера (например, другим членам семьи или же просто отдельный для работы). Как это сделать? В этом нам поможет Менеджер профилей. С его помощью можно добавить, переименовать, удалить профиль, а также установить некоторые настройки.
Запуск менеджера профилей.
Перед тем, как приступить к запуску менеджера, проверьте закрыт ли браузер Mozilla Firefox. Если же он у вас открыт, то необходимо его закрыть. Затем воспользуемся . Нажимаем ее и не отпуская жмем R (Win + R). Перед нами откроется окно «», вводим в поле firefox.exe -P
И нажимаем «ОК » Вы увидите перед собой менеджер профилей.

Здесь вы увидите свой профиль по умолчанию, в котором хранятся все ваши данные. Для выполнения всех дальнейших действий, которые мы будем описывать ниже, возвращайтесь к этому скриншоту.
Предположим, мы хотим создать новый профиль, который хранил бы закладки, историю для работы или другого члена семьи.
Создание нового профиля Firefox
Для этого нам достаточно нажать на кнопочку «Создать… » (цифра 1). Откроется мастер создания профиля.


Теперь нам нужно придумать имя нашему новому профилю. Поскольку мы планируем его использовать в рабочих целях, то давайте дадим подходящее имя, например, - Для работы . Или же другое, на ваше усмотрение.
Далее нужно указать папку, где будет храниться создаваемый профиль. По умолчанию создается папка с именем профиля. Можно использовать такой вариант. Если вы хотите задать свою, то нажмите «Выбрать папку… ». И в проводнике укажите нужную папку. Рекомендуем для профиля создать чистую, пустую папку, если же вы его установите в каталог, в котором есть какие-то файлы, то вы рискуете их потерять при удалении профиля.
Теперь, когда мы задали имя, указали место, жмем «Готово ». Новый профиль создастся и будет отображаться в менеджере профилей.
Выделяем созданный профиль и запускаем браузер. Он откроется в том виде, в котором он был после первой установки: не будет никаких закладок, история будет пустой, никаких расширений и приложений вы также не найдете.
Как переименовать профиль
Если при создании нового профиля вы допустили ошибку в его имени или же просто решили сменить, то это можно легко исправить. Для этого выделяем нужный профиль и выбираем кнопку под цифрой 2 - «Переименовать ».

Затем даем новое имя или исправляем ошибку и нажимаем «ОК ». Профиль переименуется.
Удалить профиль Firefox
Если вы перестали использовать профиль, то его можно спокойно удалить. Для этого в менеджере выберите соответствующую кнопку - под цифрой 3.

Нам предложат 2 варианта удаления.
Не удалять файлы . При выборе этого варианта произойдет удаления профиля из менеджера, однако все ваши файлы с данными сохранятся на вашем жестком диске, которые можно использовать для нового профиля в дальнейшем.
Удалить файлы . В этом случае удаление происходит не только из менеджера, но и всех файлов с вашими данными и настройками. Папка профиля удаляется полностью с компьютера. Восстановить после этого вы ничего не сможете. Поэтому учитываете этот факт при выборе данного варианта.
Настройки менеджера профилей.
Работать автономно . Если установить этот параметр для конкретного профиля, то Firefox запуститься в автономном режиме, без соединения с интернетом. В этом случае вы можете просматривать сайты, которые вы посещали ранее и проводить эксперименты с вашим профилем.
Запускать выбранный профиль без запроса . Если для конкретного профиля установлена эта галочка, то данный профиль будет загружаться автоматически при запуске Firefox.
Если же вам нужно проводить переключения между профилями, то тогда снимите галочку с этого параметра. Теперь при каждом запуске браузера вы будете сами выбирать нужный вам профиль.
На этом, пожалуй, позвольте закончить. Сегодня мы рассмотрели, как создать, переименовать, удалить профиль Firefox. Поделитесь в комментариях о том, используете ли вы свои профили в этом браузере.
До новых встреч и хорошего всем настроения!!!
Человек не ангел и не животное, и несчастье его в том, что чем больше он стремится уподобиться ангелу, тем больше превращается в животное.
Блез Паскаль
All of the changes you make in Firefox, like your home page, what toolbars you use, extensions you have installed, saved passwords and your bookmarks, are all stored in a special folder, called a profile . Your profile folder is stored in a separate place from the Firefox program so that, if something ever goes wrong with Firefox, your information will still be there. It also means you can uninstall Firefox without losing your settings and you don"t have to reinstall Firefox to clear your information or troubleshoot a problem.
Table of Contents
How do I find my profile?
Finding your profile without opening Firefox
Firefox stores your profile folder in this location on your computer, by default:
C:\Users\
Windows hides the AppData
folder by default but you can find your profile folder as follows:
- From the Start Screen, click the Desktop tile. The Desktop view will open.
- From the Desktop, hover in the lower right-hand corner to access the Charms.
- Select the Search charm. The Search sidebar will open.
- In the search box, type in:
%APPDATA%\Mozilla\Firefox\Profiles\
without pressing Enter. A list of profile folders will appear. - Click on the profile folder you wish to open (it will open in a window). If you only have one profile, its folder would have "default" in the name.
- Click the Finder icon in the dock. On the menu bar, click the Go menu, hold down the option or alt key and select Library . A window will open containing your Library folder.
- Open the Application Support folder, then open the Firefox folder, and then the Profiles folder.
- Your profile folder is within this folder. If you only have one profile, its folder would have "default" in the name.
- (Ubuntu) Click the Places menu on the top right of the screen and select Home Folder . A File Browser window will appear.
- Click the View menu and select Show Hidden Files if it isn"t already checked.
- Double click the folder marked .mozilla .
- Double click the folder marked firefox . Your profile folder is within this folder. If you only have one profile, its folder would have "default" in the name.
What information is stored in my profile?
Note: This is not a complete list. Only important information is described.
- Bookmarks, Downloads and Browsing History: The places.sqlite file contains all your Firefox bookmarks and lists of all the files you"ve downloaded and websites you’ve visited. The bookmarkbackups folder stores bookmark backup files, which can be used to restore your bookmarks. The favicons.sqlite file contains all of the favicons for your Firefox bookmarks. For more information, see Bookmarks in Firefox and Restore bookmarks from backup or move them to another computer .
- Passwords: Your passwords are stored in the key4.db and logins.json files. For more information, see Password Manager - Remember, delete and edit logins and passwords in Firefox .
- Site-specific preferences: The permissions.sqlite and content-prefs.sqlite files store many of your Firefox permissions (for instance, which sites are allowed to display popups) or zoom levels that are set on a site-by-site basis (see Font size and zoom - increase the size of web pages).
- Search engines: The search.json.mozlz4 file stores user-installed search engines. For more information, see Add or remove a search engine in Firefox .
- Personal dictionary: The persdict.dat file stores any custom words you have added to Firefox"s dictionary. For more information, see How do I use the Firefox spell checker? .
- Autocomplete history: The formhistory.sqlite file remembers what you have searched for in the Firefox search bar and what information you’ve entered into forms on websites. For more information, see Control whether Firefox automatically fills in forms .
- Cookies: A cookie is a bit of information stored on your computer by a website you’ve visited. Usually this is something like your site preferences or login status. Cookies are all stored in the cookies.sqlite file.
- DOM storage: DOM Storage is designed to provide a larger, more secure, and easier-to-use alternative to storing information in cookies. Information is stored in the webappsstore.sqlite file for websites and in the chromeappsstore.sqlite for about:* pages.
- Extensions: The extensions folder, if it exists, stores files for any extensions you have installed. To learn more about Firefox extensions and other add-ons, see Find and install add-ons to add features to Firefox .
- Security certificate settings: The cert9.db file stores all your security certificate settings and any SSL certificates you have imported into Firefox.
- Security device settings: The pkcs11.txt file stores security module configuration.
- Download actions: The handlers.json file stores your preferences that tell Firefox what to do when it comes across a particular type of file. For example, these are the settings that tell Firefox to open a PDF file with Acrobat Reader when you click on it. For more information, see Change what Firefox does when you click on or download a file .
- Stored session: The sessionstore.jsonlz4 file stores the currently open tabs and windows. For more information, see Restore previous session - Configure when Firefox shows your most recent tabs and windows .
- Toolbar customization: The xulstore.json file stores toolbar and window size/position settings. For more information, see Customize Firefox controls, buttons and toolbars .
- User preferences: The prefs.js file stores customized user preference settings, such as changes you make in Firefox Options Preferences dialogs. The optional user.js file, if one exists, will override any modified preferences.
Firefox saves your personal information such as bookmarks, passwords, and user preferences in a set of files called your , which is stored in a separate location from the Firefox program files. You can have multiple Firefox profiles, each containing a separate set of user information. The Profile Manager allows you to create, remove, rename, and switch profiles.
- If you have (or plan to have) multiple installations of Firefox on one computer, see Dedicated profiles per Firefox installation .
- If you are troubleshooting a problem with Firefox: The Refresh Firefox feature can fix many issues by restoring Firefox to its default state while saving your essential information. Consider using it before going through a lengthy troubleshooting process.
Table of Contents
Starting the Profile Manager
Manage profiles when Firefox is open
Type about:profiles into the address bar and press the Enter Return key. This will open the About Profiles page.
The following options are available:
To manage profiles, find the profile you want to change and choose from these buttons underneath that profile:
- Rename Click this to change the name of a profile in the Profile Manager. Note: The folder containing the files for the profile is not renamed.
- Set as default profile This option allows you to switch profiles. Click this to make Firefox use this profile by default at startup.
- Launch profile in new browser When you click this, another Firefox window will open using that profile.
Start the Profile Manager when Firefox is closed
Note: Another way to start the Profile Manager is from the Search box in the Windows Start menu. Close Firefox (if open), press , type firefox.exe -P and press enter .
If the above instructions do not work or if you have multiple installations of Firefox, use the following instructions instead.
Multiple Firefox installations
You can have multiple Firefox programs installed in different locations. To start the Profile Manager for a specific Firefox installation, replace firefox.exe in the above instructions with the full path to the Firefox program, enclose that line in quotes, then add a space followed by -P.
Examples:
Firefox (32-bit) on 64-bit Windows
"C:\Program Files (x86)\Mozilla Firefox\firefox.exe" -P
Removing a profile
After starting the Profile Manager as explained above, you can remove an existing profile as follows:
Renaming a profile
After starting the Profile Manager as explained above, you can rename a profile as follows:
- In the Profile Manager, select the profile to rename, and then click Rename Profile... .
- Enter the new name for the profile. Type in the new profile name, and click on OK
.
- Note : The folder containing the files for the profile is not renamed.
Options
Work Offline
Choosing this option loads the selected profile and starts Firefox without connecting to the Internet. You can view previously viewed web pages and experiment with your profile.
Use the selected profile without asking at startup
When you have multiple profiles, this option tells Firefox what to do at startup:
- If you check this option, Firefox will automatically load the selected profile at startup. To access other profiles, you must start the Profile Manager first.
- If you uncheck this option, Firefox will show you the Profile Manager each time you start Firefox, so that you can select a profile to use.
Use Sync with a new profile
When you first open Firefox in a new profile, a Welcome to Firefox page will open, with a space to enter your email address.
Под профилем пользователя Firefox понимается совокупность всех его настроек и конфиденциальных данных. Говоря проще – всякие там пароли-закладки-настройки и т.д. записываются в нескольких специальных файлах и хранятся в отдельной папке. Это и есть профиль.
Часто рядовые пользователи и новички просто не знают о том, что в браузере профилей может быть больше, чем один. И каждый из них можно настроить индивидуально. Начиная от логинов и паролей аккаунтов социальных сетей и заканчивая стартовой страницей, темой оформления и т.п. Люди же чаще для этой цели начинают скачивать и устанавливать браузеры от разных производителей. Тем самым создавая себе дополнительные неудобства. Поэтому несколько профилей пользователей Firefox на одной машине может быть нужно по двум причинам:
- С основным «рабочим» профилем Firefox возникли технические проблемы. Тогда создание нового профиля – часть диагностики, а также возможное решение возникших неполадок.
- К компьютеру имеют доступ несколько человек со своими вкусами и предпочтениями касательно настроек.
Создание нового профиля.
Чтобы создать 2-3 профиля Firefox и свободно переключаться между ними, нужно немного подредактировать ярлык браузера. Для этого следует:

Открыть свойства ярлыка “Mozilla Firefox” (Правый клик мышки – “Свойства”).
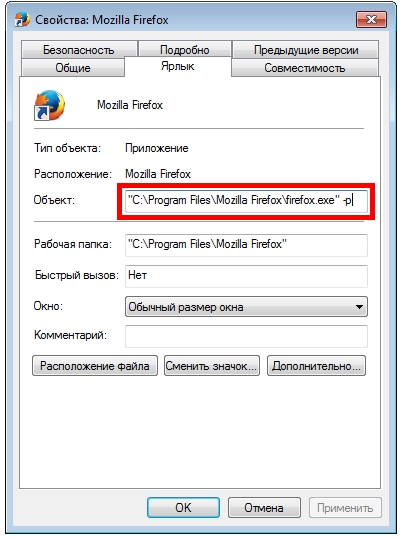
В появившемся окне к строчке “C:\Program Data\Mozilla Firefox\firefox.exe” нужно дописать через пробел “–p”. И нажать ОК. Должно получиться так:
“C:\ProgramData\Mozilla Firefox\firefox.exe” -p
Теперь запуск браузера при помощи этого ярлыка приведёт к открытию окошка менеджера профилей.

У большинства пользователей их профиль называется “default” т.е. – «по умолчанию». Далее:
1. Нужно кликнуть по кнопке “Создать”. С интересом прочитать пояснения от Firefox и нажать “Далее”.

2. Впечатать название нового профиля и клацнуть “Готово”.
Примечания:
- Можно так и оставить предлагаемое имя “Default User”, но в целях повышения безопасности, да и просто для удобства, его стоит изменить.
- Имя профиля можно задать на русском. Но рекомендуется – латиницей, т.к. это поможет в дальнейшем избежать ряда проблем.
- Папку для хранения можно задать самостоятельно (синяя стрелка на рис.3), но это необязательно.

Создание ярлыков для каждого профиля.
Если так и оставить ярлык браузера с этой допиской “firefox -p”, то тогда при каждом запуске программы будет необходимо выбирать нужный профиль кликом мышки и нажимать “Запустить Firefox”. При этом следует убрать галочку “Не спрашивать при запуске”.

Иначе при следующем старте программы Firefox уже ничего не «спросит», а откроет тот же профиль.
Но! Если машиной пользуются люди разного уровня компьютерных знаний (разные там мамы-бабушки), то лучше создать отдельные ярлыки для каждого профиля. Если на ПК работают, к примеру, Вася и Маша, то нужно:
- Создать копию существующего ярлыка. Переименовать для удобства в “Vasya. Приведённым выше методом открыть её свойства и после “firefox.exe -p” дописать (через пробел) имя пользователя Vasya:
“C:\ProgramData\Mozilla Firefox\firefox.exe” -p Vasya - Повторить эти шаги для пользователя Masha.
Примечание.
Обратить особое внимание на правильную расстановку пробелов в путях ярлыков! Все ключи, вроде -p – вводить латиницей!
В результате на рабочем столе будет три ярлыка:
– Ярлык “Mozilla Firefox”. Его следует оставить для удобства дальнейшей работы с по созданию и т.д. профилей браузера.
– Vasya. Этот ярлык будет запускать Firefox сразу с профилем пользователя Vasya. С его установленной любимой домашней страницей, закладками, историей посещённых сайтов, сохранёнными паролями и т.д.
– Masha. Этот ярлык будет запускать браузер с личными данными и настройками пользователя Masha.
Такой нехитрый приём может помочь в решении компьютерно-семейных проблем, в духе «Кто опять стёр мой пароль к Одноклассникам?!». Кроме того, такое действие повышает безопасность хранения личных данных для всех пользователей браузера.